
How to create JDBC data source connection from WebLogic to Oracle Cloud Autonomous Database ATP or ADW
Step 2. Download the Client Credentials: Click on “DB Connection” tab to get wallet_<dbname>.zip. Unzip it to a directory securely so that only authorized users have access to them. The contents of the zip file are described below.
tnsnames.ora and sqlnet.ora: Network configuration files storing connect descriptors and SQL*Net client side configuration.
cwallet.ora and ewallet.p12: Auto-open SSO wallet and PKCS12 file. PKCS12 file is protected by the wallet password provided in the UI.
keystore.jks and truststore.jks: JKS Truststore and Keystore that is protected by the wallet passport provided while downloading the wallet.
ojdbc.properties: Contains the wallet related connection property required for JDBC connection. This should be in the same path as tnsnames.ora.
Step 3. JDK version: If you are using JDK11, JDK10, or JDK9 then you don’t need anything. If your JDK version is less than JDK8u162 then then download the JCE Unlimited Strength Jurisdiction Policy Files. Refer to the README for installation notes.
Step 4. JDBC Driver:
— For 19.3 JDBC driver, download ojdbc10-full.tar.gz or ojdbc8-full.tar.gz and ucp.jar
— For 18.3 JDBC driver: download ojdbc8-full.tar.gz and ucp.jar
You need oraclepki.jar, osdt_core.jar, and osdt_cert.jar for using Oracle wallets. These are also available on the respective download pages.
Note: If you are using older JDBC driver 12.2.0.1 or 12.1.0.2 then follow the instructions on this page to connect.
How to create JDBC data source connection from WebLogic to Oracle Cloud Autonomous Database ATP or ADW
1. Go to the Weblogic administration console
URL: http://<hostname>:7001/console
Check and enable “Lock & Edit” as shown below.

2. From domain structure, click “Data Soruces”.


4. Create a New JDBC Data Source by giving a name, select scope as “Global” and Database Type as “Oracle”. Proceed by clicking “Next”.

5. Select the Database Driver as below, Oracle’s Driver (Thin) for Service connections; Versions: Any, Click Next.

6. Click Next, check “Supports Global Transactions”, “One-Phase Commit. Click Next.

7. For the next step, got to the Wallet credential location, open tnsnames.ora file.
Copy the port, host and service name from the file. (ref. example as below)
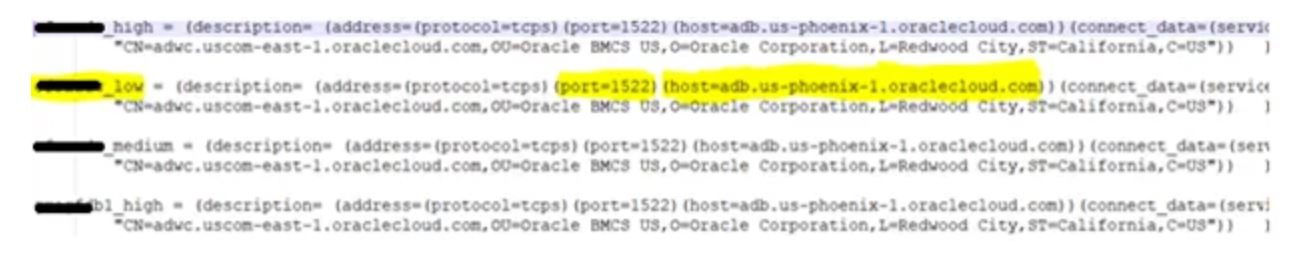
Give Database name as the service name “ofsaadw_low”, Host and port can be used as a dummy value, as we are going to change the string in the next screen. Give the Database username and password.

8. Change the URL as “jdbc:oracle:thin:@ofsaaadw_low”
The next screen is where most of the work is. Modify the "URL" to remove "//garbage:/1521", leaving a URL with just the alias that points into the tnsnames.ora file. Now you need to enter the "Properties", as discussed earlier - oracle.net.tns_admin, user, oracle.net.wallet_location, oracle.jdbc.fanEnabled, oracle.net.ssl_version, and oracle.net.ssl_server_dn_match. Alternatively, you can use the parameters for a JKS file. When using the console, JKS passwords should be encrypted using the process described at this encrypted properties blog. You can click on the "Test Configuration" button to see that you typed everything in correctly. Then click "Next".

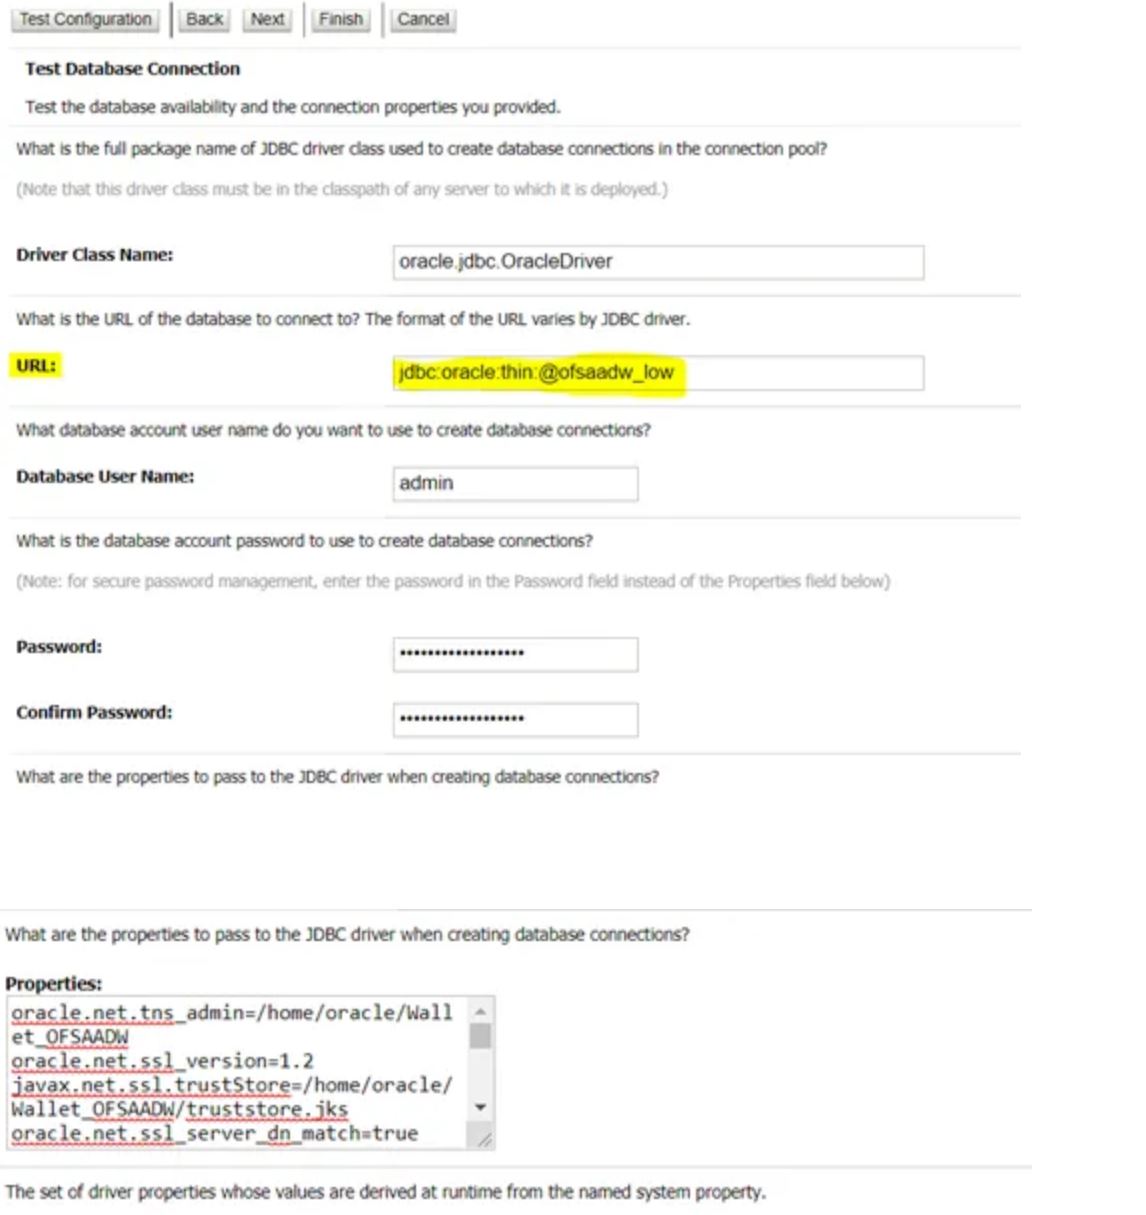
Set the Properties as below:
oracle.net.tns_admin=<PATH-Where-You-Unzipped>
oracle.net.wallet_location=<PATH-Where-You-Unzipped>
oracle.net.ssl_version=1.2
javax.net.ssl.trustStore=<PATH-Where-You-Unzipped>/truststore.jks
oracle.net.ssl_server_dn_match=true
user=admin
javax.net.ssl.keyStoreType=JKS
javax.net.ssl.trustStoreType=JKS
javax.net.ssl.keyStore=<PATH-Where-You-Unzipped>/keystore.jks
javax.net.ssl.keyStorePassword=<WalletPassword>
javax.net.ssl.trustStorePassword=<WalletPassword>
oracle.jdbc.fanEnabled=false
9. Now, Test Configuration, it should give “connection test succeeded” as a result. Click Next.
10. Select the targets, if Admin Server or any other Managed Server is in the list. Click Finish.
There are several problems that you may run into when using ATP that you won't see on a non-ATP database. Maybe some of these will save you some time.
Blob blob = BLOB.getEmptyBLOB();
ObjectOutputStream oos = new ObjectOutputStream(new ByteArrayOutputStream());
oos.writeObject(blob);
We saw this problem in the WebLogic job scheduler that is using Blob values. We were able to work around it by using Connection.createBlob() instead of oracle.sql.BLOB.empty_lob() (fixed in WebLogic 14.1.1.0.0 but it is not fixed in WebLogic 12.2.1.4.0).
This has been fixed in the 19.6 Oracle driver.